by Meredith
3. November 2015 13:13
 Wet sanding the excess epoxy is making a HUGE mess. My frustration with trying to do perfect pours (and giving up) has led me to this path and down I am paying for it. It is very time consuming to carefully remove the epoxy and not the pine wood. I've got probably 4 more hours of sanding just on the foot board. Bonus of all of it is that I decided to take off all the old finish while I was at it so it will have a consistent color with the epoxy and my new varnish.
by Meredith
16. October 2015 13:09
Epoxy has had plenty of time to cure so I have started wet sanding. I am discovering amine blush is a bitch. Wet sanding should be removing the cloudy haze (amine blush) but it hasn't been. It might be my process because I am using an electric sander and only wetting the wood and not the sandpaper. It works great for removing the excess epoxy but is probably rubbing the blush all over the wood.
I'm going to try wet sanding by hand first and really try to wash away the surface oil. Then use the power sander. I have to make sure all the amine blush is removed before I can apply a varnish on top. Plus I don't want it cloudy. Areas where the resin is clear look awesome!
by Meredith
4. September 2015 18:05
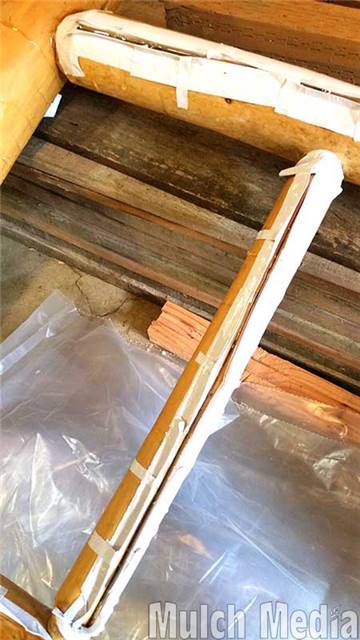
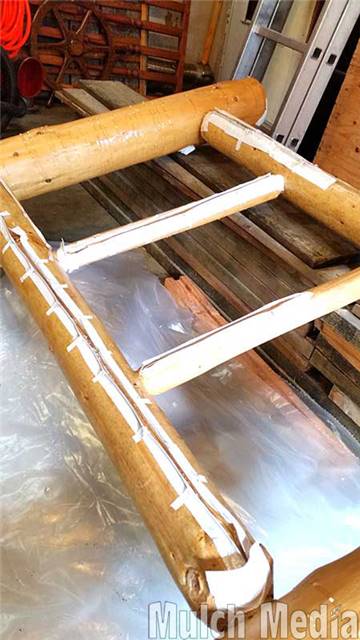
I have started creating some duct tape dams to help in areas where I just can't get the angle right. Some of these cracks spiral a bit. Also to ensure I don't waste the epoxy I mix up, I make sure I have plenty of cracks ready at that same angle and have some back up pieces waiting in the wings.
by Meredith
24. August 2015 17:59
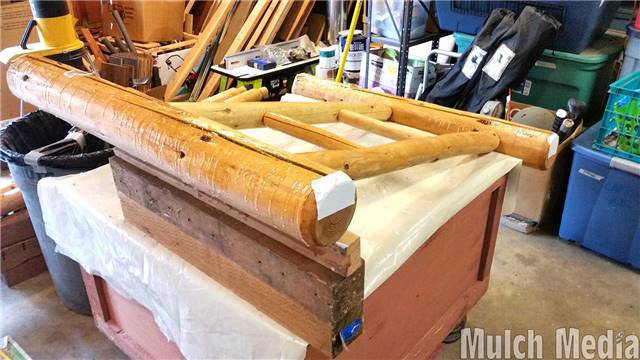
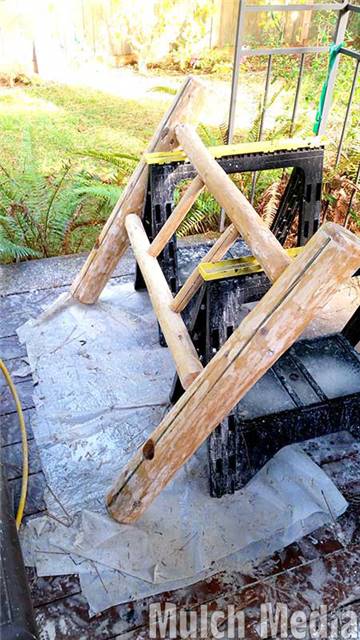
The pours for this project are starting to get complicated. If I don't make the top level the resin will dribble out before it sets. Ends are taped up but I'm also using blocks to tilt and angle the frame for a level pour.
by Meredith
13. August 2015 16:51
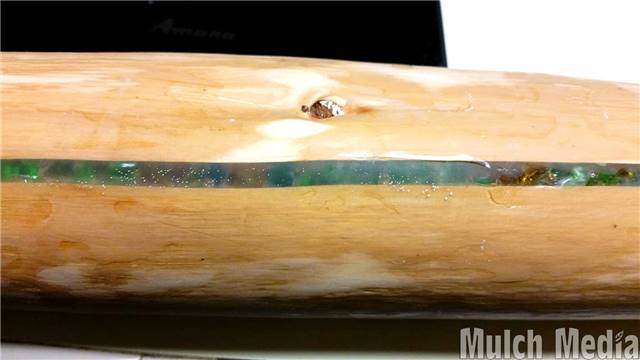
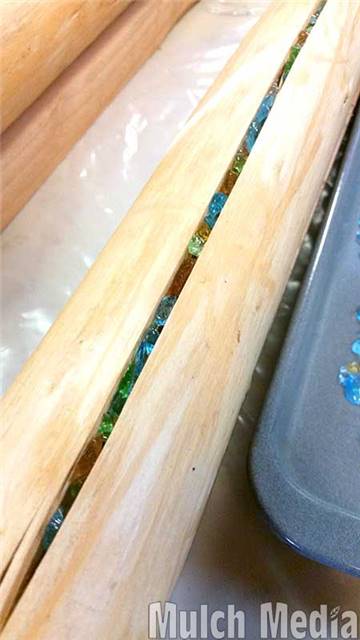
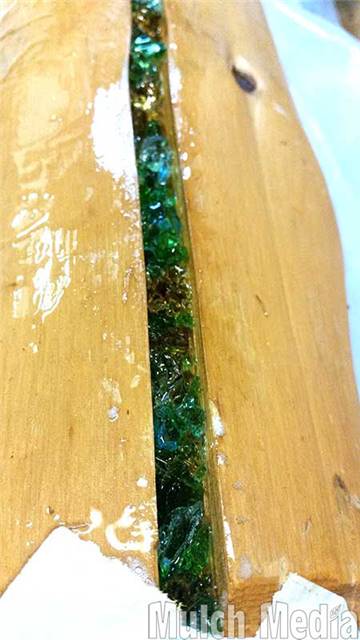 The shininess makes it really hard to photograph the colors of the glass. I think this is the best photo so far. This is after one pour of resin so the cavity isn't filled up yet. Actually, I think there might be two pours in this one (looking at the mess on the outside), but it is a really deep crack so it will take several more ounces of resin to fill it up.
There are some bubbles that I don’t generally worry about too much until the resin gets closer to the surface. At that point, I make a few passes with a heat gun to pop them.
by Meredith
9. August 2015 15:13
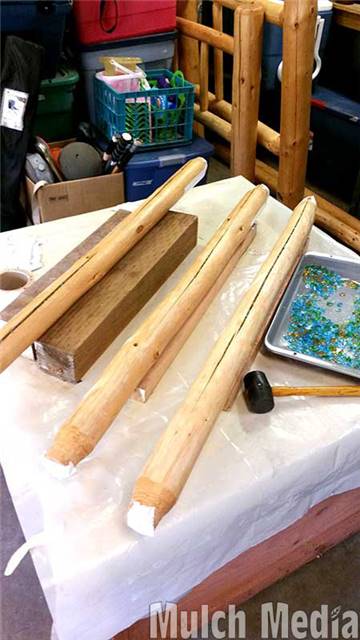
After clearing out the cracks of extra wood fibers, I have started testing the filling process on pieces of the bed that won't be seen normally. These are the logs that the mattress will sit on.
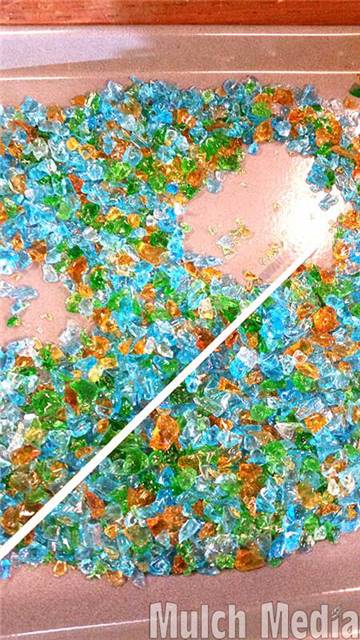
1) I have discovered that the cracks are quite narrow so I actually need much much smaller pieces of glass than what I have here. I bought bags of tumbled glass off of the internet (it's roughly tumbled) and there is a variety to the sizes, but in some cases I need slivers to fit in these cracks. I ended up taking a hammer to some of it to break it up into smaller pieces.
2) Another key learning, placing all those little pieces into the cracks took way longer than I thought it would. But the results sure are pretty!
3) First pour has taught me that pouring without making a mess will be a new skill I have yet to master. Also, the deep cracks suck up a lot of resin. I'm glad I chose to fill with glass.

by Meredith
7. August 2015 14:07
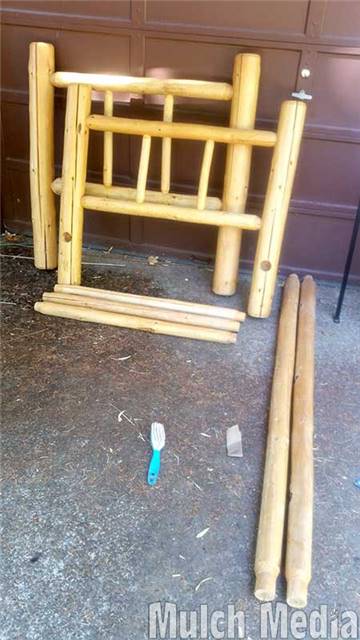

Hunter's dad made a pine log bed for Aaron (Hunter's little brother). Aaron passed away several years ago and we want to fix this bed up and pass down through our girls. There are several large cracks, and lots of small ones, running along the poles. I plan to fill all the cracks with a clear epoxy. I've also bought some tumbled glass to fill up the larger cracks and then pour clear epoxy to seal it up. It should end up looking very pretty if I don't botch up the whole project. The whole thing got a bath and then it’s time to get started.
by Meredith
17. July 2012 21:40
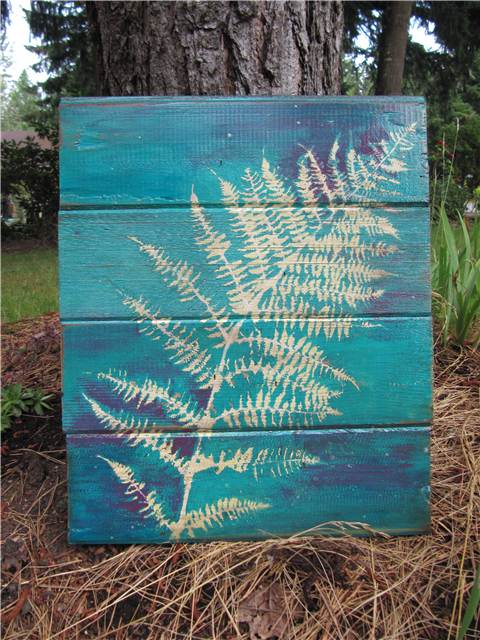
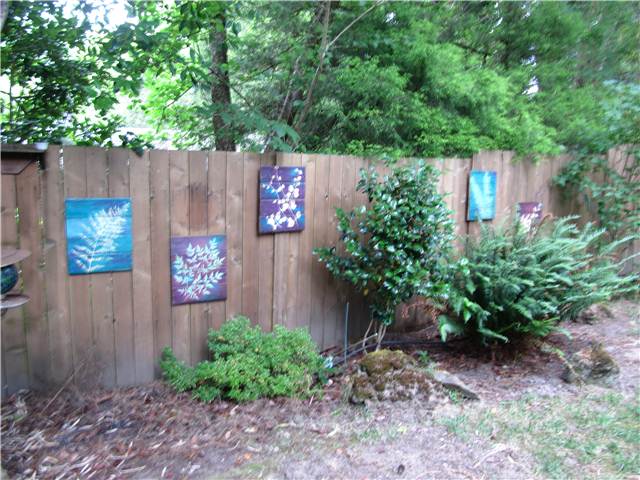
Surfing Pinterest inspired me to make some artwork for the backyard. Hunter had recently completed a fence project and there was some scrap lumber leftover. Stapling the wood together made some nice size canvases to play with.
The project combined two popular “pins” into one finished piece. These were how to distress painted wood and to make plant silhouette artwork. I won’t go into details describing how to do these techniques because I think the other websites do a great job but here is a brief summery of my steps:
I first painted the boards (6 total) a base color; 3 yellow & 3 green. I then coated one side of some plant cuttings with spray adhesive and arranged each onto a board. Next step was to carefully paint the board a second color using the plants like a stencil. (Note: Unlike the tutorial, I used latex paint and not spray paint because it was what I had on hand in the colors I liked.) I also added some random brush strokes of a third color just to add a bit more variation. Once the painting was done, I peeled off the plants and let the boards dry thoroughly overnight. The next day I did a little bit of paint touch up, adding highlights to some of the plant images. Then I used an electric sander to distress the boards; removing some of the layers of paint and in some places I took the paint completely off exposing plain wood. The final step of distressing/aging the wood was to lightly brush on a dark wood stain with a cloth. To protect the finished artwork I added a coat of polyurethane.
The only thing I would have done differently would be making the plants more firmly attached to the boards. It was very tedious to paint around them; often the wet brush would lift the leaves as I painted and made a mess out of the stenciled image. After applying the glue I laid a piece of cardboard on top of the plants and then stacked heavy objects on top of the cardboard (like you would do to press flowers). This worked well but I should have been more patient and left them on there for more than an hour (perhaps overnight would have been better). The more firmly the plant was adhered the easier it was to paint over them.
Overall I think the project turned out great and am really happy with how they look on the fence.
by Meredith
13. September 2009 10:01
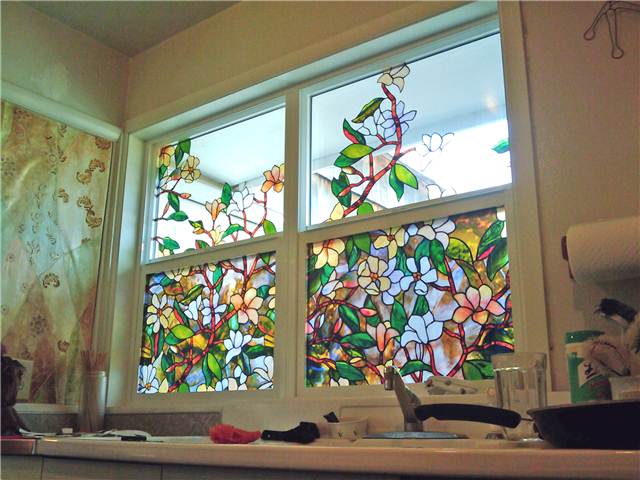
I added privacy film to the condo's kitchen window. I think it turned out pretty cool.
Not as much light comes through compared to no film, but the privacy has been really nice while the neighbors come and go all weekend. We're not even going to bother putting the blinds back up because I don't think they are needed. The color is also really nice and cheery (and adding color is important with the gray skies of the coast).
The film is super easy to install (you just spray the window with some soapy water, peal the backing off the film, and press it against the glass. Use a credit card and squeegee out the extra water and air bubbles. The print repeats in every direction so you can expand as needed by matching the seems.

For the top all I did was cut out with a sharp utility knife only the portions of the print that I wanted to continue upwards. I pieced together different sections of the print to fill in as I wanted.
I highly recommend this stuff if you need something for privacy on your windows. Not sure how it compares price wise to blinds or curtains. This stuff (magnolia is the print I selected) was $20 a roll and I used two rolls and have some scraps leftover to play with elsewhere.
by Meredith
8. August 2009 12:30
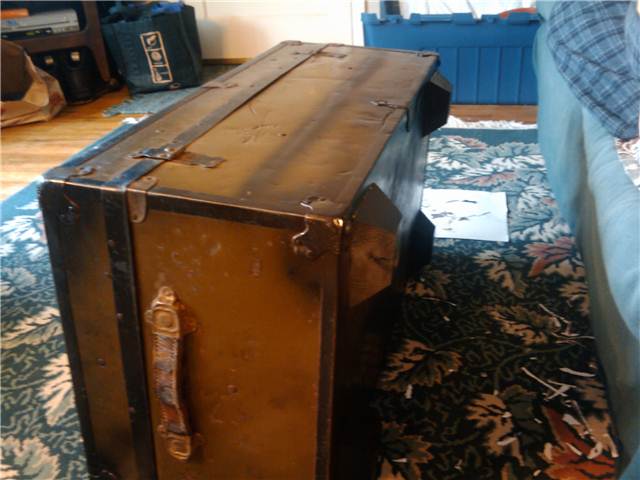 I hit a local Goodwill a couple of weeks ago because I was looking for a cheap stool or table to use as a plant stand. Didn't find a table but I found a killer deal on a trunk. I picked up a smaller trunk that they only charged me $3 for! I wasn't totally sure what I was going to do with it, but for $3, all my guilt regarding the purchase went out the window. :)
For the first step, I needed to clean off the outside. The trunk is lined in metal and most of the bottom had rusted. With the trunk outside, I sanded down the surface, wiped it clean and then gave it a good coat of black spray paint over the rusty spots. I decided to turn the trunk into a coffee table and bought some simple wood finial-things from Home Depot to use as feet. I sanded and sprayed those black as well. Later when paint was dry Hunter used some Gorilla glue and glued the feet onto the bottom.
The inside of the trunk had contact paper that was dirty, stained and was peeling off in places. I spend a couple of hours with a spackle knife and scraped the inside surface as smooth as I could get it. I then applied fresh contact paper to the inside. Man that was a bitch. Not a perfect application, but whatever, it's on there now and the whole inside surface is now clean and fairly smooth. :P
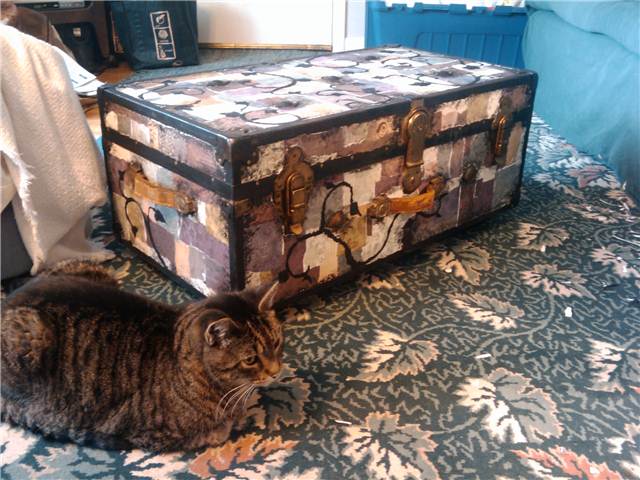 For the outside, I bought a bunch of scrap booking paper, tore it up into strips and then used watered down Elmer's to decoupage the surface…just like plain old paper mache. :) Once the surface was covered I tore up strips of black paper napkins and made ivy swirls and leaves to go over the top. I like the patchwork look of colored paper, but wanted another pattern over the top to make it a bit more random and organic.
The black hardware still seemed a bit too much of a contrast to the colored patchwork so I used a balled up paper napkin and some black paint to sponge on some black shading around all the edges and hardware. For the final step, to bring some of the original brassy/gold color back to the hardware, I painted the rivets with a dot of gold paint.
And yay refinishing is done! :) For final touches I still need to give the outside a top coat of some kind of sealant, as well as buy a piece of plexi-glass to set on the top. I also think adding a chain to the inside so that the lid doesn't open all the way would be nice too.
 Subscribe